My Creative Team


Proud Owner

Thursday, May 26, 2011
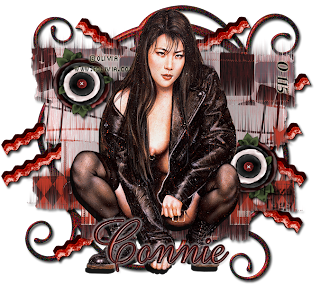
 Sassy Mai Ling Tutorial
Sassy Mai Ling
5/25/11
5/25/11
Any similarity between this and other tutorials is purely coincidental.
This tutorial was created in Photoshop CS3. You need a basic knowledge of Photoshop.
Supplies.
Scrapkit of choice I used Sassy by
Connie's Creative Chaos
Connie's Creative Chaos
Filters
Default drop shadow in photoshop
DSB Flux Blast
Font
Ambassador Script 100 pt.
Tube of Choice
I used one of Olivia's.
She now sells at Creative Design Outlet.
I got this tube at CILM though which is now closed, so not sure if this tube is available at CDO now.
This is a simple tutorial.
Let's begin.
Open a new blank document 675 W X 600 H.
Take Brass Heart Red element.
Drag into document, resize to fit and apply dropshadow (DS) in Photoshops' default settings.
Drag Ribbon Red into document. Tilt using freeform tool to suit.
Duplicate around 5 times or to suit.
Move each piece around, flip and move left or right to suit.
Unclick Heart element to make invisible.
Merge visible so ribbon layers are now 1 layer.
Aply DS.
Drag Strips Black/Red into document
Apply DSB Flux Blast filter with these settings.
DIRECTION- Upwards PERCENTAGE- 7 Click ok
I used Paper Flower 1 as an accent piece, with default ds.
Drag tube into place Resize to fit and suit.
Apply DS.
Apply the copyright info, and watermark.
If satisfied, Merge visible.
Using font of choice apply name.
I used a bevel and emboss PS setitng, settings DOWN.
Outer glow in a white color, and the default DS.
You're done!
Congrats!
Subscribe to:
Post Comments (Atom)


0 comments: