My Creative Team


Proud Owner

 Tags by me!


CT Tags for Dragon's Blood
 From Ella
I love them both, thank you so much ladies.
Cottontail Tutorial- PTU

COTTONTAIL This tutorial was written by HezaTuts on April 5, 2011.
Any similarity to any others is purely coincidental.
Template #180 by Missy. HERE
Mask by Sabine. HERE
Font Odessa LET. HERE
Outside filters- Xero Soft Vignette (optional)
Artwork by Elias Chatzoudis. You need to purchase it and obtain a license to use his work. PSPTUBESEMPORIUM
Scrapkit PTU by Gina's Gems- Orange ya glad it's Easter? HERE
Program. I use Photoshop CS3. I"m sure everything works in higher versions, but not in older versions.
Let's begin.
Open papers 12 & 17. Got to edit, Define pattern for each paper. You will be using these as stroke patterns later.
Open paper 19. Resize to 600 X 600. Transform into a layer.
Open mask, make sure it's resized to 600 X 600 and change to a layer from background..
Go back to paper.
In the layer palette, add a layer mask, go to channels and click the mack channel to visible.
Go back to mask. Select all. Go to edit, choose copy. Go back to paper, Go to Edit, choose paste. You'll see the mask and a red transparency. If it looks correct, unclick the layer mask visibility in the layer palette.
Go back to layers in the layers palette. Right click, apply layer mask. Duplicate 4 times. Merge visible .
Open your template document, resize to 600 X 600. Delete credit la yer and background layers. Drag your mask into document. resize if needed. I also rotated mine 180. I go from bottom to top when designing, so that is how the order is from now on.
Circle Layer - choose Paper 16, resized to 400 X 400. Drag on top of Circe, Right click on layer in layers palette and choose create a clipping mask. Merge Down. Apply Stroke, paper 17 Size 6 Outside. Scale 30 Apply inner shadow. I have settings pictured. These will be the default settings throughout the project.

Apply dropshadow. I have settings pictured. These are the default settings throughout the project.

Thin rectangle 1= Paper 15, resize to 550. Drag, create clip mask and merge. Stroke- I chose a green from the paper, inside, size 5. Apply drop shadow and inner shadow.
Thin rectangle 2 layer = Green Add ON paper 5. Resize to 550, Drag, clip and merge. Repeat with thin rectangle layer 3. Merge both thin rectangle layers. Apply drop & inner shadow. Stroke, pattern, Paper 12 Inside, scale 45.
Circle background layer = Paper 22. Resize to 600, drag, clip and merge. Ensure foreground color is same green from the earlier paper.
Apply Xero Soft Vignette filter, following the setitngs pictured. This step is optional because much is covered, so it's a matter of personal preference to use it or not.
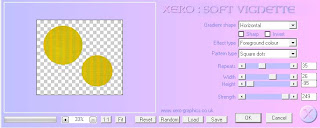
Circle Frame 1= paper 17 Pattern. Go to Layers, add layer style, Pattern overlay. Settings pictured for scale.
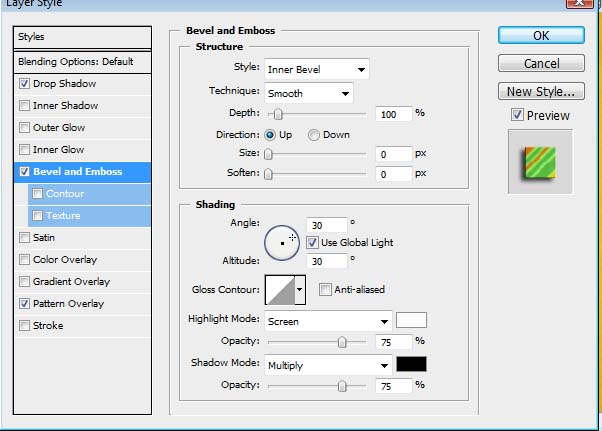
Go to layers, convert to smart object. Go to edit, transform, rotate 180. Apply Drop shadow & bevel. Settings pictured.
Circle Frame 2. Repeat Frame 1 procedure, but no need to convert to smart object and rotate. Apply drop shadow & bevel.
TUBE PLACEMENT.
Select closeup and drag into document, move to just above the circle background layer. Use eraser tool to erase any part of tube that shows through circle frame #2. Clip mask tube. Duplicate la yer. On bottom layer of tube, set blending options to Luminosity, on top layer of tube set blend to Soft Light. Merge bottom layer with circle background, then merge top layer with circle background.
Select mid size layer of tube, drag into document. Repeat of all top steps but inside circle frame #2, make sure to erase any part fo tube that show through circle fame #1.
Choose full size tube, slide onto back circle layer,flip horizontally and repeat all of above steps. Slide full size tube into document and resize if needed and place on right side of tag. Apply drop shadow.
ELEMENTS
Botanical Flower 1- drag into document, free transform size and place in middle of circle frames. Add DS "dropshadow"
Brown egg & Ribbon 2- Flip horizontal, resize as needed, and place below circle frame. Add DS Flower Spray 1, place under Egg and resize to suit. Add DS. Duplicate and rotate 180,and place in upper right hand corner below main tube.
Flower Bunch- add, resize and place under egg too. Add DS. You might need to adjust the distance on this since it's a thin piece, so the DS isn't too far away.
Curled Ribbon 3- resize to 550, add and place under flower bunch, flip horizontally. Add DS,and adjust if needed.
Duckling- add and resize and place as desired. Add DS.
Add copyright info, license and and watermarks and MERGE VISIBLE.
TEXT ODESSA LET 72. Same green as previously used. Apply Stroke- White- Outside- Size 2. Apply DSApply Bevel with pictured settings.

Save as a PMG-24 file.
You are finished!
Thank you for completing my tutorial!
New Tut- Dragon's Mistress


You can buy the kit right now at my STORE
Dragon's Blood Freebie sampler
3 papers 800 x 800
12 Elements
Click the link to snag it at my 4shared.
Leave some love here or there please! If you like it, then scroll down to see the big kit, available at Treasured Scraps.
Plus if I get to 75 followers on here, I will pick a random person to win it!
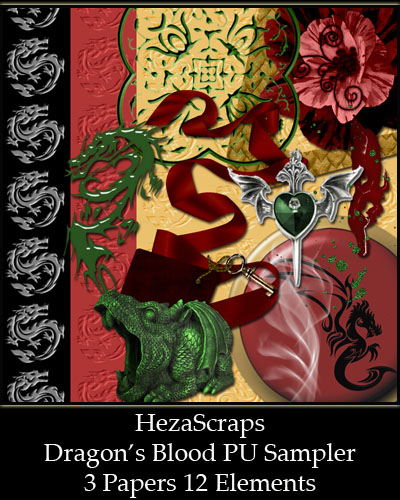
New Dragon's Blood Tagger Kit
Click on the preview to go buy the kit.

This kit includes
15 Papers 800 X 800
85 Elements
All individual PNG files at 300 DPI.
Elements include
8 Frames
5 Flowers
8 Ribbons & Bows
4 Blood Spatters
3 Glitter Spatters
Gold coins, gems, jeweled elements.
3 Buttons/Brads
4 Dragon Doodles
Ball & Cahin, candlestick, alters, stone dragons, crystal ball, goblet,
smoke, swords, treasure chest & wine.
Lots more too!
Even though it's different colors, I made this tag and forum set using this kit.


Freebie Wordart

Here's the tag I made withit, with Elias' new St. patrick's tube! I used my Gateway to Annwn kit for the tag as well. It's in my store, Treasured Scraps.

Gothic Inspirations March Blog Train
So, when I think od spring break.I think of college youth going down south and partying their crazy little butts off. My part contians extrremely adult content and adult language, so if this is not for you, move on to the next stop on the train. I've left those bits off of the preview, so please don't be fooled inot thinking they aren't there. They definitely are.
My preview.

It is tagegr sized and has
8 papers 700 X 700
31 Elements
6 Wordart
You can snag it HERE
The rest of the rain stops are below. Make sure to leave some luvins for everyone!

HEADQUARTERS
Annette with: AW Designs
Jo with: A Taggers Scrap
Angel with: Angel Flower Scraps
Kelly with: Angels Designz
Lisa with: Arty-Pharty
Deanna with: Butterfly Kisses Scraps
Jill with: Created By Jill Scraps
Stuart with: Creative Crazy Scraps
Muriel with: Creative-Disorder
Dani with: Darkmoon's Dream
Sarah with: Designs By Sarah
Stina with: Designed By Stina
Wy with: Designs by LK
SharonB with: Designs By SharonB
Dianna with: Digicats (& Dogs)
Pia with: Digital Blue Print
Conchi with: DNScraps
Vicki with: Gemini Creationz
Julie with: Glitter Girls
Jessica with: Gothic Inspirations
Hezalin with: HezaScraps & Tags
Victoria with: Maitri Scraps
Edna with: Miss Edna
T.J. with: Moody Designz
Myst with: Myst Designs
Sally with: Mythical Designs
NAC with: Naughty Angels Creations
Nette with: Nette's NightOwl Works
Rieka with: Rieka Rafita
Kimberly with: Scrap Rebellion
Marie with: SkyScraps
Kara with: Sweet Cravings Scraps
Tiffany with: Sweet Southern Comfort
Tyger with: Tyger's Tidbits
Edna with: Vermont Angel Eyes
Julie with: Whispy's D'zines
New Tut by Devious Desires

Some tags by me!
So she asked me to post the tags and a link to her blog.
The first is using her Bad Girl kit.

This second one is using her All Haterz kit.

This last one was used using a kit called Simply Black & White. It was a PTU but is now a freebie!

She has many old PTU kits now retired and free. I just saw a few i didn't snag and am gonna go get them right now!


