Blog Archive
- 2016 (2)
- 2015 (5)
- 2011 (45)
- 2010 (55)
-
2009
(105)
- December(5)
- November(14)
- October(6)
- September(12)
- August(9)
- July(7)
- June(8)
- May(1)
- April(9)
- March(7)
- February(9)
-
January(18)
- Touchdown Tut
- Travelin On Tut
- Attitude Tut with my Peppermint Twist PTU Kit
- Award Time
- New Tut- HeartBreaker- by ME!
- New Tut- Twisted
- Terminally Unique Hearts Collab
- Football Freebie
- A Tut From Heart Strings
- Tags made with HeartBreaker Kit
- A Layout using my Autumn Splendor Kit
- Heart Breaker Freebie Add-On
- Freebie Tagger Overlay
- HeartBreaker PTU Kit
- HeartStrings PTU Kit
- New Tag made with my Bruised Heart kit
- HeartGlow Mini Freebie
- Bruised Hearts PTU Tagger Kit
- 2008 (28)
Blog Archive
-
▼
2009
(105)
-
▼
January
(18)
- Touchdown Tut
- Travelin On Tut
- Attitude Tut with my Peppermint Twist PTU Kit
- Award Time
- New Tut- HeartBreaker- by ME!
- New Tut- Twisted
- Terminally Unique Hearts Collab
- Football Freebie
- A Tut From Heart Strings
- Tags made with HeartBreaker Kit
- A Layout using my Autumn Splendor Kit
- Heart Breaker Freebie Add-On
- Freebie Tagger Overlay
- HeartBreaker PTU Kit
- HeartStrings PTU Kit
- New Tag made with my Bruised Heart kit
- HeartGlow Mini Freebie
- Bruised Hearts PTU Tagger Kit
-
▼
January
(18)
Other Stuff
Followers
My Book Shelf
This plugin requires Adobe Flash 9.
Tuesday, January 20, 2009
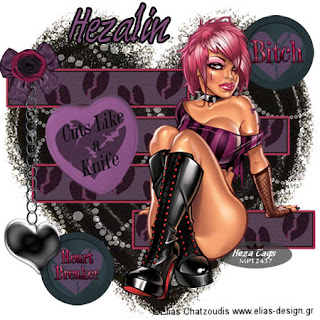
 New Tut- HeartBreaker- by ME!
9:49 PM | Posted by
Hezalin |
Edit Post

Ok I wrote this tut. I can't beleive i did it.
This version is for Photoshop
HeartBreaker Tutorial
Any similarity to another tutorial is purely coincidental.
I don’t read tuts since they are mostly for PSP, so this is solely my creation.
Supplies Needed.
Kit of choice. I used my HeartBreaker kit which can be purchased.
TUD
Mask of Choice. The one I used is uploaded here.
Mask 050- http://www.4shared.com/file/80940812/a9966f1d/Mask050.htmlTube of Choice. I used Wulfa from Elias Chatzoudis.
It can be purchased here because you need a license to use it
www,mypsptubes.com
You need a basic working knowledge of Photoshop Elements or Photoshop CS
Let’s Begin.
Toolbar- File- New-Blank File
450 X 450 Pixels,- White background
Make sure you have the folder containing the kit open in windows.
Drag in Paper of choice. I chose Paper 3 from my kit.
Drag into the blank document,
Free transform size to fit the document.
Open Mask 050, drag onto document.
Invert Mask layer to reverse Black and White.
Free transform size to fit over paper.
Using blending options- choose option Screen.
Drag another paper onto document. I chose Paper 4 from my kit.
Use the crop tool to cut into a rectangle so that 1 line of hearts remains.
Adjust image size to 350 PX width and 75 PX height.
Place where desired in document.
Choose Layer style and add a black stroke, inside of 2 PX.
Duplicate layer 3 times, and move each layer to desired location, such as the stagger I did.
Hide background and mask layer.
Merge the 4 bar layers together.
Layer style again, stoke, center. I chose a color that contrasts the kit, the one I picked was from the tube I used.
Unhide background and mask.
Drag desired poker chips onto document, and resize each and place as desired.
Drag tube onto document and resize and place as desired.
Drag chain element, resize if desired and place at right of document
Drag preferred bow onto document, free transform size and place in corner of bar background. over chain
Drag desired flower onto document. Free transform size and move over chain and bow.
Drag metal heart element over lower end of chain.
Choose Candy Heart element, drag onto document. Free transform and place as desired.
Add copyright info and your watermark info.
Merge all layers..
Choose the Text Tool
Font used- Brown Fox 16 PX, color use the eyedropper tool to choose a color from an element in the kit.
Add a text later by clicking on document and dragging til desired size is achieved.
Stroke on text is black 3PX.
Save as PSD file if you plane to change the names for tagging, or you can merge all layers and save for web as a JPG.
Congrats you have finished your Tag! Pat yourself on the back and enjoy the work.
This is the PSP version so graciously converted by my friend Loyal.
HeartBreaker Tutorial
Translated by: Loyal KD with permission
Translation from PS to PSP
Supplies Needed.
Kit of choice. I used my HeartBreaker kit which can be purchased.
http://www.terminallyuniquedesigns.net/zencart/
Mask of Choice. The one I used is uploaded here.
Mask 050- http://www.4shared.com/file/80940812/a9966f1d/Mask050.html
Tube of Choice. I used Wulfa from Elias Chatzoudis.
It can be purchased here because you need a license to use it
www,mypsptubes.com
You need a basic working knowledge of Photoshop Elements or Photoshop CS
Let’s Begin.
Open a new image - 450x450 white background
Make sure you have your kit on hand.
Open Paper of choice. I chose Paper 3 from my kit.
Right click - copy - paste on your blank image.
Resize if needed.
Open the mask provided -
Layers - New Mask Layer - From Image
Select the Mask File and make sure Invert is NOT checked.
Select the Mask layer in yer layer pallet - delete, merge group.
Open a new paper - copy & paste into your working document.
Selection tool - Rectangle - Draw out a decent sized rectangle.
Selections - Invert - Hit delete on your keyboard.
Selections Select none.
Place where desired in document.
Selections - Float - Selections - Defloat - Modify - Add Border - Outside 3 PX
Add a new layer - flood fill black - Selections, Select None.
Drag the layer under you rectangle paper layer.
Duplicate layer 3 times, and move each layer to desired location, such as the stagger I did.
Merge the 4 bar layers together.
Copy & Paste desired poker chips onto document, and resize each and place as desired.
Copy & Paste tube onto document and resize and place as desired.
Copy & Paste chain element, resize if desired and place at right of document
Copy & Paste preferred bow onto document, resize and place in corner of bar background. [over chain]
Copy & Paste desired flower onto document. Resize and move over chain and bow.
Copy & Paste metal heart element over lower end of chain.
Choose Candy Heart element, copy & paste onto document.
Resize and place as desired.
Add copyright info and your watermark info.
Merge all layers..
Choose the Text Tool
Choose your desired font - 3 PX foreground.
Type out your text - convert to raster - add drop shadow of choice.
Save as PSD file if you plan to change the names for tagging, or you can merge all layers and save for web as a JPG.
Congrats you have finished your Tag! Pat yourself on the back and enjoy the work.
Subscribe to:
Post Comments (Atom)


0 comments: