Other Stuff
Followers
My Book Shelf
This plugin requires Adobe Flash 9.
Wednesday, May 13, 2009
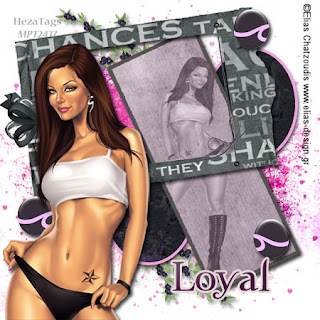
 Twilight Star Tutorial
5:53 PM | Posted by
Hezalin |
Edit Post

Twilight Star
You must have a working knowledge of Photoshop to use this tutorial.
This tutorial is created by me, Any similarity to any others os purely coincindental.
Suplies needed.
Touching the Urban Twilight by the Urban Fair Scrapkit.
This is a PTU kit you can buy at her store. www.terminallyuniquedesigns.net
Tube is Claudia by Elais Chatzoudis. You must have a licesne to use his work
from www.mypptubes.com
Mask of your choice. I used Spring by Madelief Digiscrap Design. It was free, go downlaod it. http://madelief-digiscrapdesign.blogspot.com/
Let's begin
Open a new document 450 X 450 with a white background.
Open a paper of your choice. I used paper 6.
Drag into document and resize to it using your freeform tool.
Open your mask and drag onto document , resize to fit as needed,.
Use the blending modes to achieve the look you like. I used Soft Light.
Merge layers.
Open 2nd paper of choice. I used paper 2. use your round marquee tool to select an oval shape in the paper where you like it. Create a new layer by cutting it out.
Drag that layer into the open document. resize to make smaller. Add a stroke of 5 pixels, inside and add a drop shadow.
Duplicate layer and move to a different position in document.
Open a 3rd paper. i used paper 1. use the rectangular marquee tool to cut a small layer out. Drag into document, add drop shadow and stroke of coordinating color, 5 pixels/inside. Postion over the two oval layers as shown. use free form tool to resize, tilt and position.
Open flower of choicer. i used Elelemt 47. Drag onto document, freeform and reize to quite small, move behind the shapes layers and position so that it shows up behind them. I applied a drop shadow, Nomral/and changed the color to one that was lighter than the default.
Open the tube, select the full body shot of the tube and drag onto document.
Flip horizontally.
rag on top of the rectangular layer. Using blending modes, apply luminosity and lower the opacity a bit until desired effect s achieved..
use your eraser tool to remove any parts that overlap the rectangle, such as the leg.
Merge down, doing this allows you to move them as one if you need to resize.
Open frame of your choice. i used Element 31. Drag onto document and use the freeform tool to resize, tilt amd move into position so that layers beneath show through as much as possible. Apply drop shadow.
Open string tie (element 18). Drag and reisze on top of frame on one side.
Open bow of choice (Element 3) and drag, resize, and place on opposite side of frame.
Open design piece ( Element 31) resize and place as desired. Apply drop shadow.
Duplicate, and flip horizontally and then move until you're happy with placement.
Duplicate original design piece again and then move to opposite side or whereever desired.
Using closeup of chosen tube, place on top of all elements off center, so as much of the underlying layers show through, Apply drop shadow.
Merge all layers.
Apply your licesne # and watermarks in an obcsure place.
The font I used is Twilight. 14 pixels, I used the purple glass button style that comes with Photoshop Cs3. i added a stroke of 3 pixels in a contrasting color to make the text pop.
Merge and Save!
You are done and enjoy what you've created!
Subscribe to:
Post Comments (Atom)


0 comments: